
Introduction
The Tobruk Run (colloquially known as the “Tobruk Ferry”) was a series of convoy and naval supply operations that operated with some interruptions from April to December 1941, and which kept the garrison of Tobruk supplied and able to resist Axis attacks and the ongoing siege. It was also instrumental in enabling the garrison to be an active part of Operation CRUSADER, rather than just spectators. Reinforcements in the form of tanks, guns and men kept flowing into the fortress from September to November 1941. The series of small convoy operations has, unusually, its own Admiralty Battle Summary, No. 52 “The Tobruk Run”.
Nevertheless, the operation was not easy, and the Mediterranean Fleet as well as the merchant navy suffered heavy losses (see e.g. this article on the loss of the modern mine-laying cruiser HMS Latona). It also was a continuous drain on the Royal Air Force, which was expected to give air cover to convoys as far west as possible. These were important reasons why, in January 1942, the decision was made to not defend Tobruk again should a siege situation develop, and instead withdraw further east. While the value of denying the Axis the important port, and tying down substantial Axis forces in a siege, was realized, it was not considered sufficient to offset the drain on the fleet and air force, especially given the new commitments both of these had in the Far East, after Japan’s entry into the war.
But apart from these strategic considerations, the constant missions in highly dangerous circumstances weighed on the ships, well expressed in the Reports of Proceedings of HMAS Vendetta:
Throughout the month of June, H.M.A.S. “Vendetta” has been employed on a shuttle service to Tobruk from Alexandria via Mersa Matruh carrying troops, ammunition and stores.
To give additional carrying capacity 50% of the ship’s ammunition outfit was landed. All depth charges expect two patterns. One torpedo and the Ship’s Motor Boat. Since submarines have been encountered on route the depth charges and torpedo will be re-embarked.
The conditions of service are very hard – dirt, overcrowding and lack of sleep being the major items with which the Ship’s Company have to contend. It has been found necessary in order to speed up the operation, for the Ship’s Company to dis-embark the ammunition at Tobruk as the White Pioneer Corps are lamentably slow.
The ship was painted hurriedly during the Boiler Cleaning Period at the end of the month.

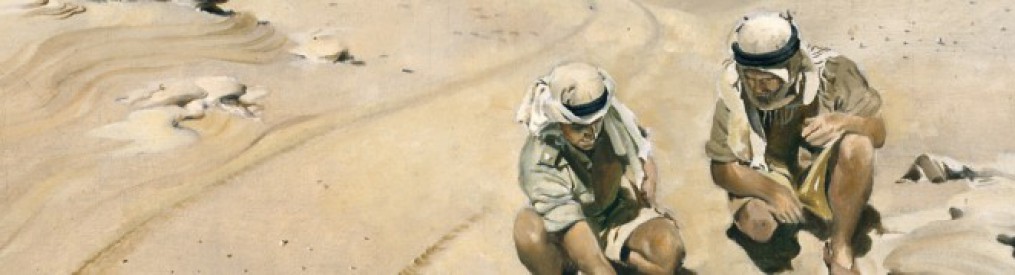
The Tobruk Ferry, HMA Ships Parramatta, Waterhen and Vendetta, June 1941. Painting by Phil Belbin, held in the Australian Naval Heritage Collection. Via Royal Australian Navy.
Convoy operations in June 1941
The work of the fleet on the Tobruk Run fell on the unsung heroes of the naval war. Elderly destroyers, sloops, small minesweepers and auxiliaries, such as Armed Boarding Vessels. It wasn’t glamorous, it was constant and it was immensely dangerous. The vessels assigned to the operation were gathered in the Inshore Squadron of the Mediterranean Fleet, with the Royal Australian Navy’s 1st Destroyer Flotilla, which formed an important part of the squadron, known as the “Scrapiron Flotilla”, as many of the vessels had reached a respectable age. The V&W class destroyers assigned by the Royal Australian Navy to the operation dated back to 1916. Similar to their enemy, the Regia Marina, the exigencies of the war forced the use of vessels that were designed for an earlier war.
Following a period of heavy losses between the start of the siege of Tobruk on 12 April and 1 June, convoys into Tobruk were suspended. A total of eight vessels had been lost in this period, clearly a rate that was unsustainable. They were:
- 1x M/S Whaler, HMT Skudd IV
- 1x A/S trawler, HMT Sidinos
- 2x Armed Boarding Vessels, ABV Fiona and ABV Chakla
- 2x Minesweepers, Hunt-class HMS Stoke and HMT Aurora II
- 1x sloop, HMS Grimsby and
- 1x Insect Class Gunboat, HMS Ladybird, sunk in the shallow waters of Tobruk harbour, and remaining in action as a semi-submerged AA battery.
As a consequence, from 7 June, Admiral Cunningham ordered that only destroyers were allowed on high-speed nighttime runs. After the end of Operation BATTLEAXE on 17 June, the restriction was lifted and convoys recommenced, with the Pass of Balmaha convoy being one of the first.
The Attack on the Pass of Balmaha Convoy
24 June was a busy day off the Libyan and Egyptian coasts, with multiple air attacks on a number of vessels, both in the port of Tobruk and off the coasts. A total of 170 German and Italian planes were in action that day, on both naval and ground targets. The defense of the petrol tanker however rested, the ‘Scrap Iron’ moniker notwithstanding, on two modern and capable sloops, the Egret-class HMS Auckland and Grimsby-class HMAS Parramatta. These were well-armed vessels with 8x and 3x dual-purpose 4” main guns, respectively, as well as other light AA armament. The fire they could and did put up was noted by the attackers, and it is almost certain that HMAS Parramatta’s continued defense saved the Pass of Balmaha after the loss of HMS Auckland.

Grimsby-class sloop HQS Wellington at Embankment. By J.P.Lon – Own work, CC BY-SA 3.0
The events of the day are somewhat confusing, and this is reflected in the confusion and errors in Admiralty Battle Summary No. 52 regarding timing of the attacks and sinking of HMS Auckland and the presence of air cover. The below is based primarily on the very detailed Italian war diary for 5a Squadra and the AAR of HMAS Parramatta, and in my view supersedes the Battle Summary account.
It appears that three convoys were at sea simultaneously. It is not clear whether any fighter protection was provided, as e.g. “Tobruk Run” refers to No. 274 Squadron engaging enemy planes, while in the No. 274 Squadron ORB the entry for the day is struck out. Italian sources note the presence of Allied fighters, but are not clear whether and how these engaged. Importantly, HMAS Parramatta does not mention fighters coming to her aid.
The Royal Navy operations on the Tobruk Run on 24 June consisted of:
1) Destroyers HMAS Vendetta and HMAS Waterhen operating as a pair, delivering stores from Mersa Matruh to Tobruk, a job they had been on for a number of runs. They also could act to back up any other convoy that might run into trouble. There is no indication that they left Matruh earlier in reaction to the attacks on the Pass of Balmaha convoy. They slipped at 1337 hours Cairo time, similar to the other days that they had staged out of Matruh.
2) Black Swan-class sloop HMS Flamingo escorting storeship Antiklia from Alexandria to Tobruk.
3) HMS Auckland and HMAS Parramatta escorting the small 742 GRT petrol tanker Pass of Balmaha, in a separate convoy which could only make six knots.
Starting from 0555 hours (Rome time, Cairo 0655 hours) 24 June 1941, when a single S.79 took off for an armed reconnaissance off the coast, action was almost constant. The S.79 discovered what it thought were a number of small merchant vessels off Sidi Barrani and attacked. They were defended by Allied fighters. This attack was carried out against the Pass of Balmaha convoy and is timed for 0915 hours (0815 hours Axis time) by the report of HMAS Parramatta.
The attack of one bomber on the three small merchant vessels north-north-west of Sidi Barrani was not successful.
Close to the merchant shops north-north-west of Sidi Barrani three fighters which did not attack.
(Italian report, quoted in German daily report)
At 0925 hours two torpedo-carrying S.79 and a Cant.Z 1007 of the cinematographic service of the Italian Air Ministry left Derna to attack the same vessels, aiming to produce a propaganda news reel in the process, and were covered by German Bf 109 fighters of JG27. At 1025 hours Axis time they instead found and attacked a formation of what they believed to be a 10,000 ton and a 7,000 ton cruiser and a 3,000 ton tanker, and believed to have sunk the New Zealand anti-aircraft cruiser ‘Okland’, subsequently confirmed by POW interrogations. No such vessel existed however and it is not clear why such a claim was made. Given the spelling this would have been HMS Auckland, and the continued insistence on it being a cruiser is likely an instance of confirmation bias on the Italian side.

Location of claimed attack on ‘cruiser’ force/Pass of Balmaha convoy, 1025 hours, 24 June 1941.
Given the composition and location of the force, it is instead certain that this attack was on the Pass of Balmaha convoy, and this is confirmed by the report in the HMAS Parramatta proceedings. Throughout the day, the two sloops kept being misidentified as cruisers by the Axis air forces.
HMAS Parramatta’s report confirms an attack by three S.79 torpedo-carrying aircraft – the Cant.Z 1007 looked similar to the S.79, and HMAS Parramatta’s captain can be forgiven for not deducing that he was supposed to be a lead participant in an Italian PR event. The attack proceeded from opposite quarters at 1148 hours Cairo time. The sloops’ air defenses engaged the planes and this was claimed to be instrumental in them dropping the torpedoes early. HMAS Parramatta combed one torpedo and did not observe the other one which she presumed to have been aimed at the tanker. Two Hurricanes also intervened according to Italian sources, and the Cant.Z 1007 and one S.79 were forced to ditch due to either AA fire or the fighters. Four of the crew of the Cant were made POW, while two of the six crew of the S.79 died of wounds, and the others spent 24 hours at sea before being rescued.
Two torpedo bombers and seven bombers, covered by German and Italian fighters, repeatedly attacked the same ships (as in the earlier report) as well as an enemy naval formation of two cruisers of 10,000 and 7,000 tons and a tanker of 3,000 tons, which at 1045 hours stood ca. 120km north of Sollum. The result of the torpedo attack could not be ascertained clearly. Further attacks were directed against two merchant ships 80km north-north-west of Sollum and against a single merchant ship 40km north-east of Ras Azzaz. Two bombers did not return.
(Italian report, quoted in German daily report)
At 1340 hours Cairo another attack was made by a S.79 bomber, with four bombs straddling HMAS Parramatta. This was one of six planes from 8o Stormo which had left at 1100 hours to attack the convoy. The other planes attacked other ships at sea or failed to attack altogether.
At 1730 hours Cairo two formations of 16x Ju87 Stuka dive-bombers were reported, which aligns with the German report that 32 Stuka were airborne. They split with 2/3rds attacking HMS Auckland and 1/3rd HMAS Parramatta which had several misses to starboard. These were a mix of German (at least 25) Ju 87 from II./StG2 and Italian (up to 7) Ju 87 dive bombers which had taken off at 1800/1700 hours. They reported only a near miss near a ‘cruiser’ and intense AA fire.
-Mediterranean-Coastline-North-Africa-21.jpg")
A scene similar to the one that presented itself to the crews on the Pass of Balmaha convoy. A II./StG2 Stuka ‘Party’ consisting of at least 22 Ju87 over the Mediterranean theatre, probably 1941. Source unknown.
At 1750 hours Cairo HMAS Parramatta reported HMS Auckland disappearing in brown smoke and likely hit. When emerging from this smoke HMS Auckland headed straight for HMAS Parramatta who had to take evasive action. When passing it was noted on board HMAS Parramatta that HMS Auckland was a wreck abaft, having lost her stern completely and on fire, but with her forward guns still firing. All the while the dive-bombers continued the attack for another 15 minutes. HMS Auckland then stopped and her crew were abandoning her while some of her officers destroyed confidential material and HMAS Parramatta commenced rescue operations.
An attack of five bombers (Ju 87) together with German bombers (also Ju 87) covered by 11 fighters, covered the same ships with bombs, of which one exploded in the immediate vicinity of the cruiser. Damage to the cruiser is to be supposed.
Cruisers north-north-west of Sollum engaged with AA, some Hurricanes.
(Italian report, quoted in German daily report)
At 1820 hours Cairo a high-level bombing attack by six S.79s developed as HMAS Parramatta had HMS Auckland’s survivors around her screws and could not move, but had to endure the attack. These were probably five S.79s of 8o Stormo, which left at 1730/1630 with an escort of G.50 fighters. The bombers were not impressed by HMAS Parramatta’s AA gunnery and pressed home the attack, executing shallow dive-bombing from 5,000 feet and scoring near misses which lifted the sloop a foot or two out of the water. They also attacked Pass of Balmaha without success. HMAS Parramatta’s A/S equipment was put out of order by these attacks, and her Captain decided to jettison depth charges, to avoid the fate of HMS Auckland, which he suspected lost her stern when bombs hit the depth charge rack. Despite the claims of successful hits by HMAS Parramatta and one of the S.79s in difficulties, three S.79 were only hit by splinters without substantial damage. This attack is not reported by the Italian command.
At 1822 hours Cairo HMS Auckland rolled over and sank, after what seems to have been a boiler explosion breaking her back. Pass of Balmaha’s crew, deciding that their luck was being pushed, now took to the boats. In a small tanker carrying petrol, while witnessing HMS Auckland on fire, this seemed a “wise” action, as the Captain of HMAS Parramatta noted.
A final attack developed at 1950 hours Cairo, with three formations of dive bombers. This caused many splinters to hit HMAS Parramatta, but left her otherwise undamaged. Pass of Balmaha was now recrewed, but reported her bunker fuel being contaminated, so she could not get underway. In the end, HMAS Parramatta asked HMAS Waterhen to take her in two, and the little tanker that could made it to Tobruk.
HMAS Parramatta’s captain reported 48 divebombers attacking, presumably in total between the two waves, with another five observing from height but not attacking. Dive attacks were made in groups of two or three planes at a time.
The war diary of the Afrika-Korps only notes that formations of the Luftwaffe (sic!) succeeded with several direct hits in attacks on two cruisers and a tanker, sinking the tanker and that one cruiser was not found later, implying it had also been sunk. The war diary of the Kriegsmarine is a bit skeptical and suspects the sunk cruiser might have been a destroyer, but is excited about a 500kg bomb hit on a heavy cruiser.
About two weeks later, Appendix 8 to Luftwaffe situation report 668 on 8 July 1941 somewhat corrects the matter, albeit with a wrong date.
25.6.41 Gunboat “Auckland” sunk. X.FL.K. Bombs, sea area near Tobruk
Hits scored. 15 minutes after the attack a contact holding plane noted several explosions on the boat. According to statements by Lt. MÜNCHEBERG the boat showed a developing heavy fire at the stern at 1730 hours. The crew was taken off with boats and launches from a nearby cruiser. An hour later Lt. Müncheberg sighted the formation, now consisting of only one cruiser and a tanker. In the same sea area a large oil spill was sighted. Gunboat destroyed.
The gunboat was first identified as a cruiser as the configuration of two double turrets afore and aft resembled the gun configuration of light cruisers.
Addendum: Based on prisoner reports this was the English gunboat “Auckland”, 1,200 tons, which served as AA defense escort.
It is worth noting that other than the configuration of the gun turrets, the other item that probably confused pilots was the very small size of the Pass of Balmaha, of only 742 GRT. If they thought they saw a more typical tanker of e.g. 5,000 tons, then of course the two escorts would have grown accordingly, to 6-7,000 tons, i.e. cruiser size.
The Eyewitness Account from HMAS Vendetta
I am very grateful to have received permission from the Naval Historical Society of Australia’s Secretary, Mr. Burroughs, to use the article below, which was first published in 1974, as the basis for this article. The pictures are the original ones which accompanied the article.
The Loss of HMS Auckland
(June 1974 edition of the Naval Historical Review (all rights reserved))
‘At 6.28 p.m. she rolled over and sank.’ L J. Brien was serving in HMAS Vendetta at the time of the loss of this fine ship. The Vs and Ws and the sloops were a closeknit team supplying Tobruk in 1941. The loss of Auckland was a personal loss to all on the ‘Tobruk Ferry.’
HMS Auckland rolling over and sinking, 1828 hours, 24 June 1941. You can see that her stern had already gone, while her engines continued to generate smoke. By kind permission of the Naval Historical Society of Australia.
OUR EASTERN MEDITERRANEAN FLEET in 1940-41 had suffered appalling casualties – 70 ships from carrier and battleship down to sloops. These losses were all sustained in 12 months and amounted to the worst casualties ever suffered by the steel clad Royal Navy in one area and within that space of time.
Against this fearsome set of conditions, then, as soon as the plan to send this small convoy on the Tobruk blockade run was known, it became the constant topic of speculative opinion.
The tanker involved, Pass Of Balmaha, was well known to the fleet and already had had an amazing run of luck against air attack. She was quite small, incredibly grubby and a readily expendable item (perhaps because of her predecessor’s association with Felix von Luckner).
The two escorts were soon to prove the excellence of their crews. Auckland had, I clearly recall, the most audacious camouflage in the fleet (actually shared the title with HMS Grimsby – also soon to die), and the job of renewing the myriad slivers of green, brown, grey and black geometrical designs must have plagued her seamen no end. Parramatta had an elaborate, fragmented camouflage too – but of a more sombre hue.
HMS Auckland at speed on 24 June 1941. By kind permission of the Naval Historical Society of Australia.
These two ships, the latest sloops, had at least up to date twin gun mounts – A, B, X – three sets of two barrels of 4- HAAA with improved fuse setting gear plus semi auto loading.
HMAS Parramatta pre-war. Royal Australian Navy. This is a better quality copy of the same picture in the original article.
Within a few hours after dawn on the convoy’s first day out, they were located by a hostile recce aircraft and at once the escorts took up radio contact with Alexandria and the two standby ships – HMA Ships Vendetta and Waterhen. Soon, we heard the air attack imminent warnings and shortly after calls for help from the convoy. By 1100 we were off Ras-el-tin just clear of the swept channel and scattering the caique fishing fleet as the two destroyers cut slap through them building up to flat out revolutions (29-30 knots), with Waterhen taking up a mutual umbrella barrage position about 1,500 yards off our port beam. The exposed gun crews scratched about bracing themselves against our racing pace through a slightly choppy sea. We cleared guns and our .5 ‘Chicago Pianos’ cut through a smoke burst placed handily astern by our X-gun mount for both ships to use. Not much talk now as we settled into the race to catch the hard pressed convoy. Our ETA would be around 1800. Since we still had no radar on the Vs and Ws, lookouts were at maximum alert and our excitement grew with each new message received.
Vendetta, circa August 1941, at which time she joined the 7th Destroyer Flotilla.She wore this camouflage from 30 June 1941. From Royal Australian Navy. This is a better quality copy of the same picture in the original article.
The convoy was meanwhile being overwhelmed by continuous dive bomber attacks – JU87s (Stukas) – sometimes a score at the one time – scrambling to get into position to dive out of the sun. Later we learned that this day became without doubt, Parramatta’s day. During the long, exhausting fight she shot down four aircraft plus three probables. At that time, this was for our fleet a one day record for an AA shoot.
Time and again during the action Lieutenant Commander J. H. Walker placed Parramatta close to the defenceless Pass of Balmaha to increase his defensive role and, just as often, miraculously, his ship came rolling and shaking out of the fray; her decks streaming water from bomb bursts. The news that the undamaged tanker’s crew had abandoned her and taken to the lifeboat for dear life was no surprise to us. We had all witnessed good gun crews dive for cover because of the demoralising fury of a Stuka attack. Merchant seamen had, virtually, no defence and were often the sole target for hostile bombing runs. We were now about two hours steaming astern of the trio when news came of Auckland’s impending end. She had received several mortal hits – the time was 1800 on 24th June 1941.
Vendetta was now straining slightly ahead of Waterhen away to port when we burst upon the scene. Auckland had disappeared forever beneath the waves leaving only oil patches, ammo boxes and other pitiful remains floating amongst splintered woodwork and, at last, a whaler boatload of her survivors now in the act of being taken aboard Parramatta. The Stuka Parade had been called off as we approached and whilst we were still out of range. Over to starboard lay Parramatta and we closed on her. Waterhen continued straight on and closed with the tanker. A ‘prize crew’ from Waterhen got the Pass of Balmaha under way, and then collected the tanker’s crew.
HMAS Waterhen. By kind permission of the Naval Historical Society of Australia.
Coming closer to Parramatta we could hear them cheering and calling to us, their enthusiastic shouting carrying across long before we called back. Understanding dawned on us just how much our arrival had raised their morale. Auckland’s survivors were in a shocking state. Many were badly smashed and others were choking to death with fuel oil in their lungs. One hundred and sixty four survivors of Auckland’s complement of 190 were picked up.
On Parramatta’s poop deck I singled out three of my old classmates from Flinders Naval Depot – Harold Erby, Jack McMillan and Sid Glossop and we shouted across to each other. They, and Parramatta herself, were soon to be entombed beneath the sea. A few months later she was ‘tin fished’ off Tobruk Harbour and only 21 of her crew lived to tell the tale – her gallant skipper went down with the ship.
It seemed only moments before darkness began to envelop all and in the later deep gloom Parramatta slipped away bound for Mersa Matruh nursing her sorely pressed RN comrades. We wished them a trouble-free run home.
Waterhen had decided to tow the damaged tanker. The destroyer reached Tobruk later that night in the middle of the usual tremendous German and counter British artillery barrages. The whole desert skyline aflame for miles – not unlike the distant, leaping, fiery glow from a bad bush fire. Great waves of cannonade rolled out to us and soon subdued all talk as we stood off the cluttered maw of Tobruk Harbour, ushering Pass of Balmaha safely into the then world’s most unsafe berth. Less than a week later Waterhen herself went to the bottom of ‘Mare Nostrum’ off Sollum.


The Butcher’s Bill
Of Auckland’s crew of 200, 38 men died either during or after the attack, with HMAS Parramatta burying two at sea on the way to Matruh, and delivering another 20 who were so severely wounded that they could not walk. Almost half of the fatal casualties fell on the engine room crew. The list below is from the excellent Naval History Net.
- BOWSHER, Charles J, Able Seaman, RFR, P/J 44141, killed
- BROOKS, Cecil, Ordinary Seaman, P/JX 212128, killed
- BURDEN, Maurice R H, Stoker 1c, P/KX 83670, MPK
- CHALMERS, John, Able Seaman, P/SSX 17095, MPK
- DAVIES, Arthur, Able Seaman, P/JX 176189, MPK
- DINES, James H, Cook (O) 1c, P/L 14276, MPK
- DONNELLY, Hugh, Able Seaman, C/SSX 20366, DOW
- GRANT, Henry A H, Able Seaman, D/JX 145064, killed
- GRANT, Jack, Leading Steward, P/LX 22360, MPK
- HALLAS, Uriah, Stoker Petty Officer, P/KX 78803, MPK
- HARVEY, Edwin, Able Seaman, D/JX 187955, MPK
- HAYWARD, Thomas E, Cook, P/MX 56899, MPK
- HEATH, Frederick W, Able Seaman, C/JX 169057, MPK
- HOUSE, Harry N, Stoker 1c, P/KX 83487, MPK
- HUNTER, Thomas, Able Seaman, RNVR, P/CD/X 2794, MPK
- KELLY, John A, Leading Stoker, P/KX 84559, MPK
- MAY, William F, Stoker 1c, P/KX 97347, MPK
- MCKELVIE, David C, Stoker 1c, P/KX 93398, MPK
- MCKINLAY, George P, Able Seaman, P/SSX 18304, MPK
- MEADLEY, Cecil L, Lieutenant (E), killed
- MERRITT, William A, Stoker Petty Officer, P/K 64970, MPK
- O’BRIEN, William, Stoker 1c, P/K 59853, MPK
- RAMSEY, Edward, Stoker 1c, P/KX 93359, MPK
- RATCHFORD, William R, Stoker 1c, C/KX 96588, killed
- ROBARTS, Charles J, Surgeon Lieutenant, MPK
- SCARLETT, George E, Able Seaman, P/JX 174206, MPK
- SIDEY, George S, Able Seaman, RNVR, P/CD/X 2618, DOW
- SMITH, Herbert H, Stoker 1c, P/KX 93362, MPK
- SMYTH, Arthur P, Act/Engine Room Artificer 4c, D/MX 52272, MPK
- SOPPITT, Robert, Stoker 1c, P/KX 97628, killed
- SOUTHALL, Henry T, Act/Leading Seaman, P/JX 142300, DOW
- STEPHEN, George, Able Seaman, RNVR, P/CD/X 2901, killed
- STURGESS, David A, Able Seaman, P/JX 171092, MPK
- SWEENEY, Daniel, Able Seaman, RNVR, P/CD/X 2714, killed
- SWEENEY, John, Stoker 2c, C/KX 108672, killed
- WALLACE, Johannes P, Stoker 1c, P/KX 93393, MPK
- WILBY, William H, Able Seaman, D/JX 165233, MPK
- WILSON, Robert H D, Canteen Assistant, NAAFI, MPK
The Aftermath
As noted above HMAS Waterhen followed HMS Auckland to the bottom of the sea shortly after. On 28 June 1941, during another convoy to Tobruk she was sunk by dive-bombers. Following a number of near-misses, she was so severely damaged below the waterline that she had to be abandoned and sunk, despite efforts by her consort HMS Defender to tow her in. Unusually, no sailor lost his life during her loss.

HMAS Waterhen, the next Tobruk Ferry to go. (Allan C Green, State Library of Victoria) Via Royal Australian Navy.
Pass of Balmaha (see information and a picture at this link) had a lucky escape this time, but it would not hold. In September 1941 German submarines arrived in the Mediterranean, to increase the pressure on the fortress of Tobruk and the Mediterranean Fleet in general. They quickly made themselves felt, and on 17 October 1941 U-97 torpedoed Pass of Balmaha on her outbound voyage with petrol for the Tobruk garrison.
HMAS Parramatta survived the little tanker that could by just about six weeks. On 27 November she fell victim, with heavy loss of life, to U-559, while escorting another convoy into Tobruk at the height of Operation CRUSADER.
HMAS Vendetta was the only member of the 24 June convoy to survive the war. Laid down in November 1916, it was 29 years later, in November 1945 that she was decommissioned from the Royal Australian Navy, after a service life that saw her fight German, Bolshevik and Italian forces in three wars, the North Sea, the Baltic Sea and the Mediterranean.
Postscriptum
An Italian floatplane sent out to find the survivors of the Cant.Z 1007 that had made an emergency landing at sea in the morning, instead came back with Australian and New Zealand soldiers who had attempted to escape Crete by canoe. Unfortunately for them, they crossed the search zone the floatplane covered, and didn’t escape becoming POW after all.
Postscriptum II
Pass of Balmaha (a pass near the small village of Balmaha in Scotland) was a name previously assigned to a sailing vessel built in 1888. In 1915 she was captured by a German submarine and then converted into the famous commerce raider SMS Seedadler.
Sources
- Admiralty Battle Summary No. 52 “The Tobruk Run”
- AWM87 290/1 Reports of Proceedings, HMAS Parramatta
- AWM78 352/3 Reports of Proceedings, HMAS Vendetta, AWM.
- D.A.K. war diary, 24 and 25 June 1941
- Daily summaries of Luftwaffe operations, 24 and 25 June 1941 (with thanks to Andy Mitchell)
- Appendix 8 to Lagebericht 668, 8 July 1941 (with thanks to IgorrB on 12 O’Clock High)
- Diario Storico 5a Squadra, 24 and 25 June 1941 (with thanks to Michele Palermo)
- KTB Kriegsmarine SKL, 24 and 25 June 1941
- ORB No. 274 Squadron June 1941
- Royal Australian Navy ship histories:
