

 Bardia, Cyrenaica, Libya. Re-captured by Allied forces on 2 January 1942, Bardia was repeatedly attacked from the air. The harbour seen during a raid by bomber aircraft of the South African Air Force shows the first bomb bursts. (AWM MED0273)
Bardia
Bardia is a town on the border between Libya and Egypt, flanked by Sollum. It has a small, natural harbour, and is otherwise pretty unremarkable. During the war it was besieged twice, and fell each time to Empire forces, almost one year apart. It was to change hands another two times in 1942, but each time without being defended.

BARDIA, LIBYA. 1942-01. RUINED BUILDINGS ON THE FORESHORE OF THE HARBOUR. (Courtesy AWM 022707)

Commonwealth Map from Operation COMPASS.
1: Halfaya Pass
2: Sidi Omar
3: Bardia
4: Fort Capuzzo
Bardia becomes a fortified sector
Following the visit to North Africa by the OKH representative, General Paulus in May 1941, the importance of the border was recognised. South and east of Bardia the Axis forces subsequently established a substantial system of modern fortifications, shielding the town to the east and blocking the coastal road at the Halfaya Pass, and providing cover to the rear of the right wing of the forces encircling Tobruk. Axis forces were also placed in the Egyptian border town of Sollum, which was located just east of Bardia, with Upper Sollum on the escarpment, and Lower Sollum on the sea.
The line of successive fortifications ran from Halfaya Pass to Sidi Omar in the west, and it was occupied by German Oasenkompanien and regular Italian infantry, with 21. Panzerdivision’s I./S.R.104 under the famous Major Bach holding the Halfaya pass position. The system of border fortifications was integrated, and depended on Bardia for supplies. From November 1941 these fortified locations were slowly rolled up from the west by first 4 Indian Division, and then 2 South African Division, or abandoned as the ability of the garrison to maintain the posts continued to shrink, due to lack of supplies.

Detail of fortifications on the border at Sidi Omar, from 42 R.T.R. War Diary. UK National Archives, WO169/1421
Bardia as a logistics hub
During the late Spring and through summer of 1941, Bardia had become a hub for the German forces in particular, with some supplies delivered into the harbour directly by submarine, and surface vessels dodging the Royal Navy control of the sea lane between Alexandria and Tobruk. The value of supply into Bardia’s harbour was estimated to be six times that of supplies arriving in Tripoli, because there was no need for fuel to transport them over long distances to reach Tobruk. Due to its size, the harbour could only take small vessels however, and due to its forward location it was very exposed to Royal Air Force attacks.
Isolation during CRUSADER
With the withdrawal of the Axis forces from the Tobruk perimeter on 5 December 1941, Bardia had become isolated, with no immediate hope to re-establish a connection. Rommel argued for an evacuation, Dunkirk style, but the Italian navy was in no mood to risk its fleet and vessels for the purpose. In the end the only course left open was to order the border positions to hold on until the last round, and to hope that a counter strike could relieve them. The latter was a very long shot, and it failed to come to pass.
General Arthur Schmitt, since September commander of the rear area of the Panzergruppe (Korueck 556) had been installed as Commander of ‘Sektor West’ (Bardia) in November, when Division z.b.V. Afrika, which previously controlled the area, had been moved to the Tobruk siege line for the planned attack on Tobruk. Captured after surrendering his command, he returned from captivity after the war and was briefly employed by Egypt in 1949/50 to help create a pan-Arab army, an then engaged in far-right politics in his home state of Bavaria. He died in 1972.
‘Sektor Ost’ was the Halfaya Pass itself and the remaining chain of fortifictions extending south-west from there. It was commanded by Italian General Fedele de Giorgis General Officer Commanding 55 Infantry Division Savona, who in turn surrendered his command to the South Africans on 17 January, having run out of food and water. After returning from the war he commanded the Carabinieri from 1947 until 1950. The Savona division was the only Italian division subordinated to German command at this time.
Schmitt was, judging from his communications with Rommel, a spiteful character, and very anti-Italian. He spent quite a bit of ink accusing his Italian co-commander of seeking an early surrender. It is ironic therefore that after the complaints by Schmitt about de Giorgis, whom he accused of seeking to surrender as quickly as possible, the Italian general held out over two weeks longer, buying the Axis forces at the Marada – Mersa el Brega position critical time. Both generals received the Ritterkreuz for their defense of the border sector, with de Giorgis being the only Italian to receive it in North Africa in 1941/42, and one of only nine to do so throughout the war.
The existence of the fortification system shaped the battle around Tobruk. Rommel’s ill-advised ‘Dash to the Wire’ was meant to relieve the pressure exerted on the border fortifications by 8 Army’s 13 Corps. The existence of the garrisons led to 5 New Zealand Brigade being stationed at Sidi Azeiz, where they were overrun by the Afrikakorps on 27 November. On 25 November, 4 Indian Division destroyed almost all that remained of 21. Panzerdivision’s armoured strength at Sidi Omar.
Even after the end of the siege of Tobruk, with the land route to Bardia permanently cut, two German vessels made the perilous journey into Bardia in mid-December, Marinefaehrpraehme (MFPs or F-Lighters) of 2. L-Flotille. To the chagrin of the fortress commander though, the first one (F-150) only carried useless supplies of just 4 tons of engine oil, and had only been despatched with a view to picking up much needed replacement tank engines from stocks in Bardia. So much for the vaunted German planning. The second one (F-146) brought much needed supplies however, carrying 70 tons of food, 20 tons of ammunition, and 2 tons of mail. It then remained in Bardia to enable supply to be ferried from Bardia to Sollum. It was however lost within days to Empire artillery fire on 24 December 1941.
Following a relatively inactive siege of about four weeks from the end of November 1941, 8 Army’s 30 Corps and the South Africans of 2 South African Division, supported by the infantry tanks of 8 Royal Tank Regiment and British and Polish artillery, as well as the Royal Navy, commenced the assault on Bardia on 31 December. After a short but sharp battle, the final assault drove into the Axis lines at 0030 hours on 2 January 1942, and Bardia fell for the second time in a year, surrendering unconditionally on the same day. This was the first time in WW2 that a German garrison surrendered, and the first time that German general to surrender his command in WW2.
The Axis forces lost about 12,500 men in the two fortress sectors. At the same time, several thousand Empire force prisoners held in Bardia and Halfaya were returned. After Bardia had been cut off, these men could no longer be evacuated. Some senior officers, such as Brigadier Hargest of 5 New Zealand Division, captured at Sidi Azeiz on 27 November, were evacuated by submarine.
While the losses of men and material were painful to the Axis, there was a clear benefit to the Axis of not considering an evacuation. The defense of the border sector had created a serious logistical challenge for Middle East Command, since it presented a block on the only relevant road on which supply could move in the theatre. By blocking the Halfaya Pass, Axis forces forced the Empire forces to make a very long detour through the desert, eating up time, vehicle space, and fuel, before they could turn north and rejoin the tarmacced coastal road, the Via Balbia. While Tobruk was open as a port, it could not supply the required amounts, and after the fall of Benghazi on 24 December 1941, it took about a month to make the port operational again, because of the need to deal with deliberate destruction and to sweep for mines.
The Empire Forces thus missed a major opportunity to end the war in North Africa when they decided to let Bardia and Halfaya be in December, starving them out, rather than risking the casualties that a full-scale assault could bring. It was the second time in six weeks that Norrie, GOC 30 Corps failed to undertake energetic action, this time by not ordering 2 South African Division attack. There was probably a concern about the ability of the South African forces to sustain heavy casualties, after the loss of 5 South African Infantry Brigade at Sidi Rezegh in November 1941.
When they did attack, it is also not clear why the focus was on Bardia, rather than Halfaya. The town and harbour itself was of little value, and could easily be by-passed. If the resources had been expended on attacking and clearing Halfaya pass from the east, it is likely that this would have succeeded in clearing the coastal road two weeks earlier.
By weakening the ability of the Empire planners to supply the forward area, the failure by the South Africans to robustly assault and take Bardia and Halfaya in early December contributed to the success of the Axis counteroffensive in late January.
As an aside, the siege of the Border fortifications saw the entry into battle of the Free French Brigade, which was to make a name for itself at Bir Hakeim just half a year later. The Empire troops consisted at various stages of South African, British, Indian, New Zealand, Polish, and Free French ground troops, British, Australian, and Free French air force units, and British and Australian naval units.
The End of the Affair
A British Pathé film records the surrender. You can watch it at this link.
Related posts
- Order of Battle of Savona Infantry Division
- ULTRA Intercepts and Air Raids on Bardia
- The End of the Halfaya Garrison
- Losses in Operation Crusader
- Free French Air Force Operations
Art

Dargie noted, “Shortly after we had re-taken it [Halfaya Pass] from the Italians and Germans in January ’42. Behind the knocked-out British tank can be seen one of the large guns, with French markings, which the Germans had mounted at the top of the Pass”.
The gun in the picture above is a 15.5cm GPF gun used by German coastal artillery. By the end of the siege these powerful guns had pretty much run out of ammunition. The Matilda infantry tank in the foreground carries the white/red/white mark required for the identification of British armoured vehicles during the operation. This Matilda II would have been from ‘C’ Squadron, 8 R.T.R, or from 44 R.T.R. – ‘A’ and ‘B’ Squadrons 8 R.T.R. were in Valentine tanks, and it is likely that this picture presented itself in the Bardia area, rather than at Halfaya Pass.
Photos
 T
T
The scene on board HMS AJAX as round after round of 6″ shells are fired into Bardia. (Courtesy IWM8037) This bombardment was undertaken by the Royal Navy’s 7th Cruiser Squadron, out of Alexandria

Bardia, Cyrenaica, Libya. 6 January 1942. Aerial view taken on the day that Bardia fell shows a long line of prisoners stretching down the road being rounded up by the Allied land forces and transported in the back of trucks. (Courtesy AWM MED0280)
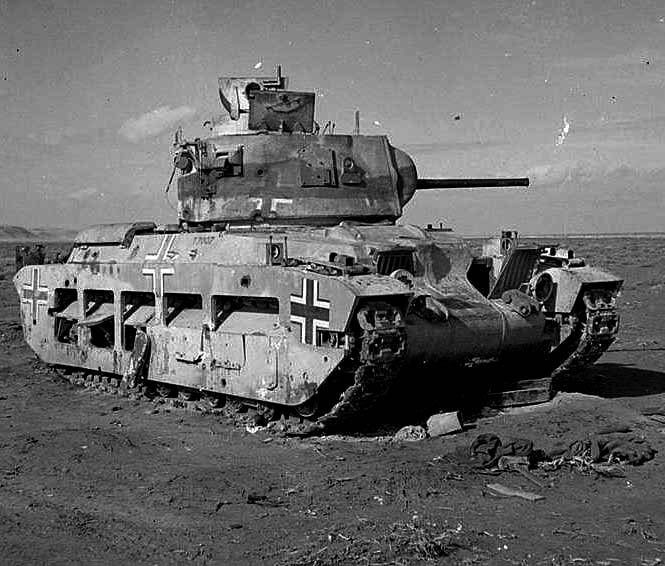
A Matilda tank captured and put to use by the Germans, most likely 15. Panzerdivision, and most likely re-captured by New Zealanders in November 1941, west of Bardia. This picture wrongly associates the tank with the successful recapture of Bardia on 2 January 1942.
 The gun turret of a Matilda tank that had been captured and concreted into position to be used as part of the defences of Halfaya Pass, 16 March 1942. A Valentine tank passes by in the background. (Courtesy IWM E9320). Note the tank still carries the Operation Crusader tank marking of white/red/white.
