Introduction
This article started off because of a note in the high-level traffic files of 8 Army on a request by 4 Armoured Brigade to scour the Delta for additional M3 tanks on 20 November. It then morphed into an in-depth analysis of its 19 November battle with Panzerregiment 5 and its supporting arms which was eventually published in the South African Journal Scientia Militaria where it is available for free at this link. The aim of this article is now to provide a more accessible read.
The Middle East Command M3 Stuart Tank Holdings
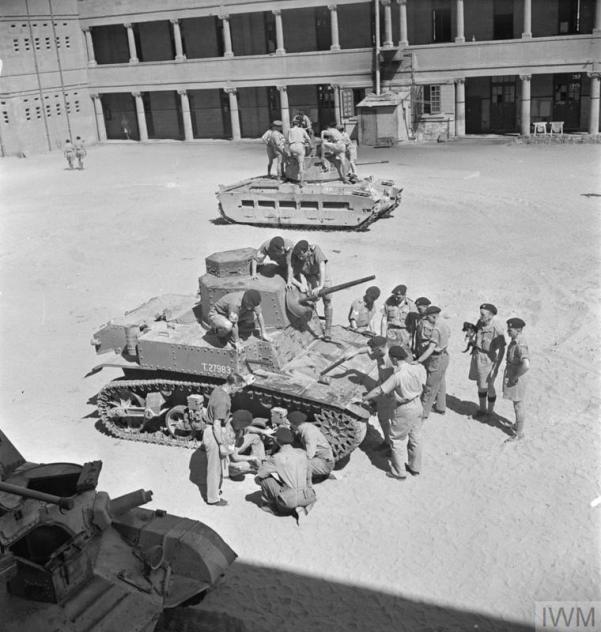
The first M3 Stuarts arrived in July 1941 (see here). By September 158 were in theatre, plus 4 M2 tanks, and in October another 152 M3 Stuart arrived, together with the first 2 M3 Grant, which were not to see action until May 1942. By 11 November 1941, 188 M3s had been issued to 4 Armoured Brigade, 90 M3s were with ‘B.O.W.’ which I presume to mean ‘Board of Works’, i.e. in workshops. Four (4) were held with 4 Hussars in the Delta, and 16 with school/training units, for a total of 315 tanks[1]. While this was a remarkably fast build-up, with the first M3s (and some M2s) only having arrived in June 1942, it appears that the tempo of operations was higher than expected, as was the ammunition expenditure.
4 Armoured Brigade at the start of CRUSADER
The Brigade entered battle with 166 M3 tanks, and 22 held in reserve.
RTR tank crews being introduced to the new American M3 Stuart tank at a training depot in Egypt, 17 August 1941. Note the Matilda in the background. IWM Collection.
Tank and Ammunition Shortages
The note from the situation reports of 8 Army is below.
SECRET
Record of telephone conversation with Lt-Col BELCHEN, G1, S.D. HQ Eighth Army, at 2300 hrs, 20 November 1941
———————–
Eighth Army require as many M3 American tanks as possible on top priority. That is to say, this type of tank is required more urgently than other types, as the reserve held by Eighth Army is all gone.
Eighth Army require to be informed how many M3 American tanks can be sent as a result of this request and when they may be expected.
Further stocks of ammunition for the weapons mounted in M3 American tanks are urgently wanted. It was understood that this request referred to 37mm rather than .300”. Lt-Col Belchem said that a quantity of this ammunition was being held at Alexandria for onward despatch, and that if this reserve was already on its way forward well and good; if not he recommended that as large a quantity as possible should be flown up.
The above demands have already been referred to the D.D.S.D.
The following day, the rather scarce transport plane capacity of Middle East Command was put at disposal to service this request, and the Bombays of No. 215 Squadron flew ten tons of ammunition up to LG122 for 4 Armoured Brigade, ‘at short notice’ as the RAF report noted.
The reason for the complete utilization of the reserve was of course combat. Specifically, 4 Armoured Brigade had the misfortune of running into Kampfgruppe (Battle Group) Stephan on 19 November to receive its baptism of fire in CRUSADER. The Kampfgruppe was named after the CO of Panzerregiment 5 of 21.Panzerdivision, and it consisted of the whole regiment . The action is instructive in terms of either the initial misperception of enemy tank losses that had quite fatal flaws for the appreciation of the CRUSADER battles by 8 Army Command, or the tendency by German commanders to underreport their tank losses – take your pick.
4 Armoured Brigade is introduced to 21.Panzerdivision
1. The German side
PR5’s write-up of the battle is below. The regiment had spent the morning trying to destroy some armored cars stuck in a swamp. At 1210 hours it was ordered verbally by the divisional commander, Generalmajor von Ravenstein, to assemble between the infantry of MG8 and II./IR104 with II./AR155, a 105mm howitzer battalion, and 3./Flak 18 under command. It was then to turn east towards Sidi Omar, and cut off and destroy the 200 enemy tanks that AA3 had reported there – 4 Armoured Brigade.
At 1235 hrs General Cruewell visited the command post of 21.PD and was informed of the intent, but also of the fact that the mass of the division had to form a hedgehog defense, and was suffering from shortages of petrol and ammunition. It is arguable that if all of the division had advanced that 4 Armoured Brigade would have been in a precarious position on this day – it is hard to see how it would have stood up to an encounter with a full Panzerdivision.
It is of note that the confidence level of the Germans was so high that they launched an attack with such an objective while being substantially inferior – PR5 fielded only 120 tanks on the evening of 18 November, of which 35 were the (useless) Panzer II, 68 were Panzer III, and 17 were Panzer IV. The regiment was of course battle-hardened (or jaded), having fought British tanks in the desert on various occasions since April of this year.
[…]The Regiment recalled 2 Coy and moved off at 1420 hours, II/5[1] forming the first wave, and I/5 less 1 Coy) the second, following its left rear. About 1545 hrs 1 Coy[2] returned to the regiment.
About 1600 the regiment came up against 130 enemy tanks NW of Gabr Sredi. A violent action developed, during which the enemy brought up more tanks on both flanks, until the total was about 180, besides 2 batteries and some SP guns. His main weight was opposing the regiment’s left flank, where I/5 had the heaviest fighting. The action lasted until after dark. The enemy was driven back SE and 24 American tanks were knocked out, 2 of them by the AA guns.
The regiment leaguers with the intention of continuing the attack towards the same objective on 20 November.
Tank losses 19 Nov:
(a) Total losses by enemy action: 2 Mk III.
(b) Damaged by enemy action: 1 Mk II (which could not be salvaged as the enemy reoccupied the battlefield); 4 Mk III
(c) Technical damage: 1 Mk IIIA 0105 hrs the regiment was ordered to attack to 5 km north of Sidi Omar at 0600 hrs 20 Nov.
The total losses reported amount to eight tanks, which would bring the regiment’s strength down to 112 from 120 the day before. Curiously though its evening report only reports 83 operational tanks, 24 II, 45 III, and 14 IV. That’s a discrepancy of 29 tanks, and may indicate that the number of damaged tanks (either enemy action or mechanical failure) was actually higher, but they were not reported. This is partially confirmed because the next day, the regiment lost one Panzer III to enemy action, but reported an increase in operational Panzer III from 45 on the 19th to 47 on the 20th.
It is also notable that the assessment of enemy strength was overestimating the tank numbers by about 30% initially.
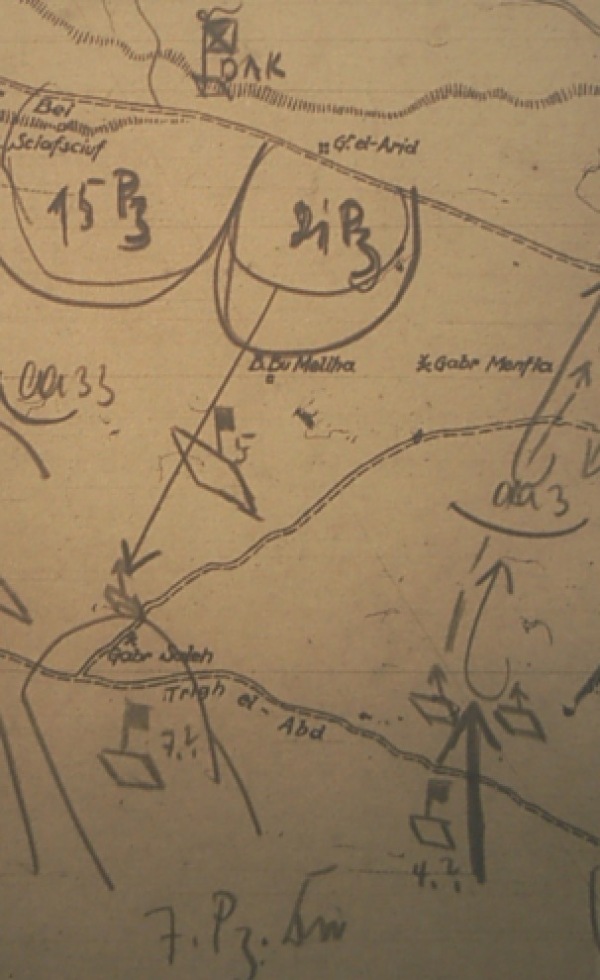
The evening map from the D.A.K. war diary, showing clearly the direction of the thrust of 21.PD
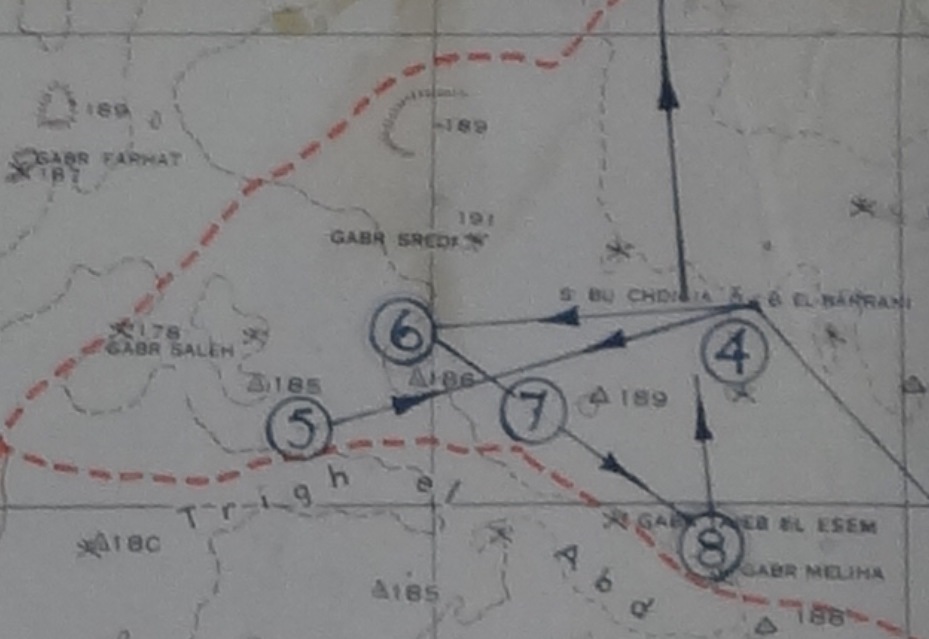
Detailed map of the battle area of KG Stephan and 4 Armoured Brigade on 19 Nov 1941. Rommelsriposte.com collection
2. The British side
It is important to note that 4 Armoured Brigade did not fight as a brigade. It’s regiments were scattered about, and it was quite badly exposed to a concentrated attack.
First, the war diary of 4 Armoured Brigade, which was not based on written notes, these having been lost due to enemy action. It should not be treated as authoritative[3]:
One Squadron of 3 R Tanks and L/N Bty 2 RHA were employed in supporting 1 KDG who were reconnoitring towards TRIGH CAPUZZO.
The Bde reconnoitred its Battle pos and was disposed as follows – 8 H on left, 5 R Tanks Rt with 3 R Tanks in reserve.The remainder of 3 R Tanks was sent at 0940 hrs to support 1 KDG in the area BIR GIBNI and moved north.
Information concerning small packets of enemy was continuous and at 1535 hrs it was reported that 100 enemy tanks had been seen moving SW at 458388. 8 H and 5 R Tanks were ordered to move fwd to meet this attack on the track GABR SALEH – SIDI AZEIZ.
Actually, this enemy force had moved SOUTH of SW and at 1600 hrs the main direction of the enemy attack was seen to be on the post occupied by 8 H. 5 R Tanks who were east of 8 H were ordered at 1630 hrs to come up to the SOUTH of 8 H. 3 R Tanks was ordered to move to the track junction 4 1/2 miles SE of GABR TAIEB EL ESEM to replenish and come into reserve.
The main German attack came in very heavily and and Bde HQ was shelled and as a result Bde HQ moved, first NORTH then EAST and SOUTH to avoid this.
The main action was fought at short range by 8 H and later by 5 R Tanks at a longer range; Fighting ceased as darkness fell and the Bde leaguers in its battle posn with 8 H and 3 R Tanks a few hundred yards away. The enemy himself leaguered about 2 miles NORTH and probably recovered his damaged tanks under cover of darkness. Our casualties were 8 H 20 tanks and 5 R Tanks 3 tanks.
It was estimated that 19 enemy tanks were destroyed for certain, possibly 26, and in addition L/N Bty had destroyed 9 Army Troop Carriers[4]. Some of these tanks had been destroyed by L/N Bty and a Tp of NH.
It is notable that the initial estimate of the German tank force was an underestimate by about 20%. While the German tank losses claimed were considerably higher than what the German report admits, they don’t tally badly with the actual reduction in runners on the German side, especially if some of those 9 armoured troop carriers were also tanks. It is not impossible that the British tanks hit, and even penetrated the German tanks, but that the after-armour effects were too weak to knock them out or even seriously damage them.
5 R.T.R. account of the action:
1430. Bn ordered to move back to area Bir el Barrani. Information Bde that 8 Hussars were being attacked by enemy tanks east of Gabr Saleh. The Bn moved at once to Trigh el And at about 457362 and assist.
1630. The Bn came into action on left flank of 8H. Enemy did not press home attack and owing to failing light there was little effective action on either side. Enemy withdrew at dark and Bde leaguered about 2 miles east of Gabr Taieb el Essem. No personnel casualties in last action. Two tanks, mechanical casualties, both recovered.
5 R.T.R. had lost another tank earlier at Bir el Hamarin to enemy action, with Lt. C. Moss and his crew all becoming casualties due to burns.
8 Hussars account of the action:
During the morning enemy armoured car activity continued and reports were received that he had a number of tanks in the vicinity, also a report that 100 enemy tanks had been seen moving south-west at 458388, which was about twelve miles due North of our position.
The Regiment was ordered to move forward to meet this threatened attack on the track Gabr Saleh – Sidi Azeiz. In fact this enemy force had moved practically south and, at about 1600hrs, the full force of the enemy attack developed on the position held by the Regiment. The information received from 2LT T M Mills, whose troop was the B Sqdn standing patrol, was in fact the only warning received by the Regiment of the impending attack.
The attack was preceded by a dive-bomb and dive machine-gun attack by nine ME109s[5], which was concentrated on RHQ. The enemy force consisted off between 70 and 100 MkIII tanks, supported by MkIVs. They advanced in a compact formation from the North. When within 1,500 yds of our position, they opened out to a certain extent and commenced to fire. Their shooting was very accurate and a number of our tanks were laid out before they came within effective range of our guns. They advanced to within about 700yds, but did not make any attempt to come much closer, except in the later stages of the battle, when they made an attempt to break through on our left flank, which position was being held by 5RTR.
The battle was fiercely contested until dark, and the Regiment prevented this attempt to break through our line. This was a good performance, particularly in view of the fact that the enemy had superiority in numbers, his tanks were more heavily armoured, they hard larger calibre guns with nearly twice the effective range of ours, and their telescopes were superior.
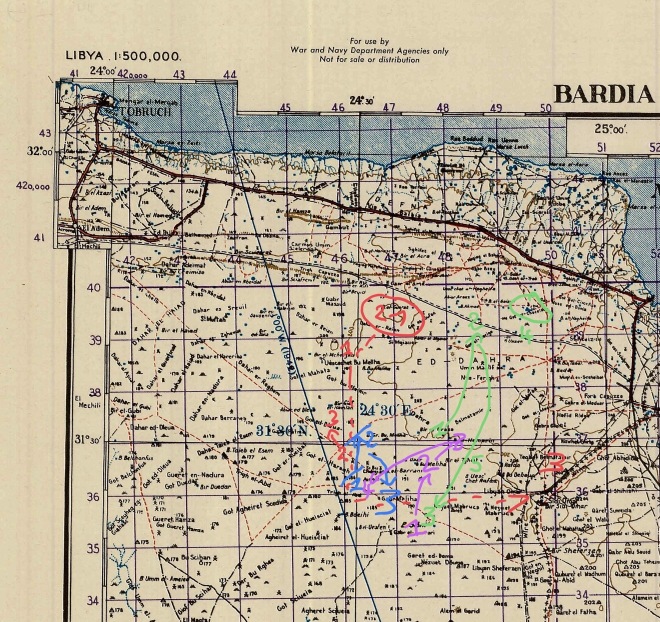
Making sense of the battle. This is the standard 1942 map, sheet ‘Bardia’, which is not the map used by the units. I have used the original map, and transposed from the war diaries. There are probably detail errors, in particular in placing the initial and second intended position of 8 Hussars, but they don’t affect our understanding of the confused nature of this battle. At 1600 hours the 4 Armoured Brigade position was as follows: 8 Hussars = Blue2, 5 R.T.R. = Mauve3, 3 R.T.R. A Squadron and R.H.Q. = Green2, B Squadron = Green4, and C Squadron = Green Circle. Brigade units south/south-east of Blue2
Red: German movements 21 = concentration area, dotted line = intended movement, 21.PD, 1 = first British report of 100 tanks at 1535 hrs 2 = first contact at 1600 hrs, 3 west = night leaguer, 3 east = original objective
Blue = 8 Hussars, 1 = original position, 2 = intended blocking position, 3 = end of the battle
Mauve = 5 R.T.R., 1 = starting position, 2 = engagement at Bu Meliha and 3 = end of pursuit to Bir el Hamarin, 4 = destination ordered at 1600 and reached at 1630 hrs
Green = 3 R.T.R., 1 = Position at 1330 hrs, 2 = 200 MET reported, 3 R.T.R. off in pursuit at 1350 hrs, 3 = Position ordered at 1600 hrs, reached at 1930 hrs (A Squadron and R.H.Q.), and 2345 hrs (B Squadron), Circle = suspected position of C Squadron at 1600, when Crisp reports being able to see the sea, 4 = B Squadron at 1600 hrs, 5 = C Squadron out of petrol at 1750 hrs
Assessment
1. British Performance
There are three ways how this battle can be read – either ‘British tank regiment holds off German enemy more than twice as strong’, or ‘British armoured brigade caught napping and only saved by outstanding performance of one of its regiments; or both of these.
It is clear that 4 Armoured Brigade was not on top of its game. It’s regiments were spread out, and they could not and were not ordered to be concentrated quickly enough, with 3 R.T.R. only receiving the recall at 1600 hours. During the battle it appears that Brigade command did not contribute much if anything, due to the attention being paid to it by the German artillery. For example, it appears that the Brigade reserve, B Squadron 5 R.T.R. was not committed in support of 8 Hussars until the full regiment arrived at 1630 hrs. The war diary is riddled with errors, but certainly written to appear as if Brigadier Gatehouse actually had things under control. He had not, in my view, and got very lucky on 19 November. More on that below.
The performance of 8 Hussars was outstanding. They pretty much by themselves fought off a German Kampfgruppe that had more than twice the numbers of tanks, and over 60% more medium tanks, as as 50% more artillery than supported 4 Armoured Brigade, a battery of 88s, and air support. More importantly, they did so without losing their shirt. 20 tank losses are heavy, but this is maybe to be expected when you have to fight superior numbers in inferior equipment. The rather modest self-congratulation of ‘this was a good performance’ in the war diary is British understatement at its best.
5 R.T.R. seems to have received an indication of things going wrong rather early, at 1430 hours, although that could be an error in the Brigade war diary, off by one hour. By the time they arrived, they were too late to contribute much before the fighting ceased.
Contrary to what the Brigade’s war diary claims, 3 R.T.R. never entered the action. A further breakdown in 3 R.T.R., with B & C Squadron going off on its private war, exacerbated the matter, albeit not critically so. 3 R.T.R. war diary is quite sheepish about this. It is clear that regimental H.Q. did not have the regiment under control, as it admits for C Squadron.
2. German Performance
In a word: poor. Kampfgruppe Stephan should have walked all over 8 Hussars, then over 5 R.T.R., and then over A Squadron 3 R.T.R. before falling on the rear of 7 Indian Brigade to the east of Sidi Omar at dusk. They had substantial superiority in all arms, and brought rather good experience to the battle ground. It is impossible to tell what went wrong, but it appears to me that maybe von Ravenstein was too optimistic when he expected that Stephan would be happy about having to attack and destroy a tank force almost twice his size, with unknown support. It is clear from the British war diaries that he did not press his attack, taking counsel of his fears when exaggerated enemy tank numbers came in. Whether this was because the tank crews were battle-weary, we shall never know.
In the end, he retired with nothing much to show, other than the destruction of 20 tanks, and the at least temporary loss of 1/4 of his command. Unlike the Germans, the British could afford this. It is noticeable that despite the reported low losses on the day, Panzerregiment 5 did not regain even close to the strength it had on the morning of 19 November 1941 until well into 1942. Within a week it was down to 25 tanks, and within two weeks it went down to 7 tanks.
Overall
The battle is often held up as a failure for the British. There is certainly some truth in it, looking at the handling of 4 Armoured Brigade which has much to be critical about, and also 3 R.T.R., which seems to have thought it’s task was chasing irregulars on the plain, rather than engaging in a fight with a capable mechanized enemy. in particular. It is also often claimed as an early example of British commanders overclaiming German tank losses. On the contrary, had 4 Armoured Brigade concentrated on its core task of defeating the enemy tank force, as set out in the Operation Objectives, it could have met Kampfgruppe Stephan with a full Brigade, numerical superiority, and probably would have dealt it a very bloody nose. This was an opportunity missed which deserves criticism.
Nevertheless, based on the available evidence, I would arrive at a more differentiated set of conclusions. First, while the Brigade command failures are very clear, it is much less evident to me that the Germans did much better. In fact, it is arguable that the British side gave as good as it got, and more importantly, it prevented the Kampfgruppe Stephan on accomplishing a task it simply did not seem to have much appetite for in the first instance, namely the destruction of the Brigade, and the move to Sidi Omar, which would have endangered 7 Indian Brigade.
On the German side, timidity seems to have played a big role, and the parallel failures of both sides cancel each other out to some extent. Knowingly, Stephan threw away the chance to eliminate 4 Armoured Brigade. Unknowingly, Stephan probably threw away a chance to end Operation CRUSADER there and then. Had he succeeded in overrunning 8 Hussars, it would have split the British forces into two, with XIII Corps to the east facing the border defenses, and XXX Corps to the west, wedged into a triangle that can be drawn by linking Bir el Gobi, Sidi Rezegh, and Taieb el Essem. This would then have left 7 Indian Brigade and the New Zealand Division between the hammer that would have been the D.A.K., and the anvil that would have been Bardia-Halfaya. It is likely that, especially given that on the same day 22 Armoured Brigade was defeated outside Bir el Gobi, this would have stopped the British advance, and led to a withdrawal back across the border, or at least south, leaving the Axis a free hand against Tobruk.
So in conclusion, other than 8 Hussars, nobody came out of this engagement with much to be proud of, and a chance to at least severely tilt Operation CRUSADER in one direction or the other had been missed, by both sides.
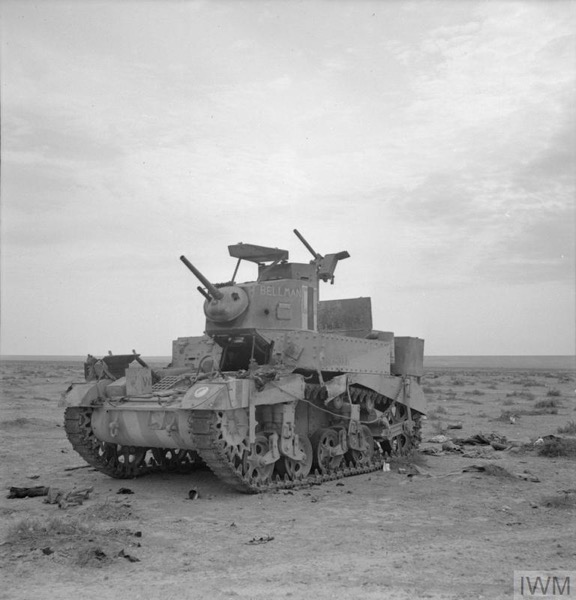
‘Bellman’, an M3 Stuart tank of 8th Hussars, 7th Armoured Division, knocked out near Tobruk, 15 December 1941. IWM Collection
Notes
[1]WO169/952, 11 November 1941 tank statement
[2]Unit designations as in the original translation made by British army historical services for the purpose of producing the official history.
[3]Should be ‘2 Coy’
[4]Units present as follows: Tanks – 3 R.T.R., 5 R.T.R., 8 Hussars; Artillery: 2 R.H.A. (1 battery, 8 guns); 102 A/T Regt (Northamptonshire Hussars) with 2 batteries 2-pdr portee.
[5]This would include tanks lost to 3 R.T.R.’s jolly on the Trigh Capuzzo.
[6]Other than 8 Hussars, only the 2 Scots Guards war diary mentions air attacks. It is highly unlikely that Me 109s would have bombed anyone, they were not able to carry bombs at that stage of the desert war, and neither was any other single-engined Axis plane at this stage.

The “M2” would have been M2A4 Light Tanks, last of the inter-war American light tanks and the predecessor to the M3 Stuart series.
“B.O.W.” was Base Ordnance Workshops.
LikeLike
Thank you Peter!
LikeLike
Thanks so much what a great project Can someone tell me who the two men were that Auchinleck first wanted as 13 Corps and 7Armor Division commanders for Crusader John Conells book Auchinleck says this on page 285 in a letter to General Dill He wanted Pope for 30 Corps but doesnt name the other two I guess Godwin Austin and Gott were his second choices thanks
LikeLike